"On-Call" Shifts Flow
This is part 3 of the series and today we’ll go over setting up the Microsoft Flow to configure our “on-call” call routing. In the part 1 of the series, we’ve configured the Azure Automation runbook, and in the part 2 we’ve created the “On-Call” Shifts.
Today we’ll be configuring a Flow that at the high level does the following:
- Finds the “On-Call” shifts for today
- Lookup User assigned to today’s “on-call” shift
- Launch the runbook to configure the operator for auto-attendant
Configuring the flow
Lidia, as the manager of the Team, decided to be the owner of the flow. As the owner, she would have full control of the flow, can edit it, and most importantly access to flow runs history.
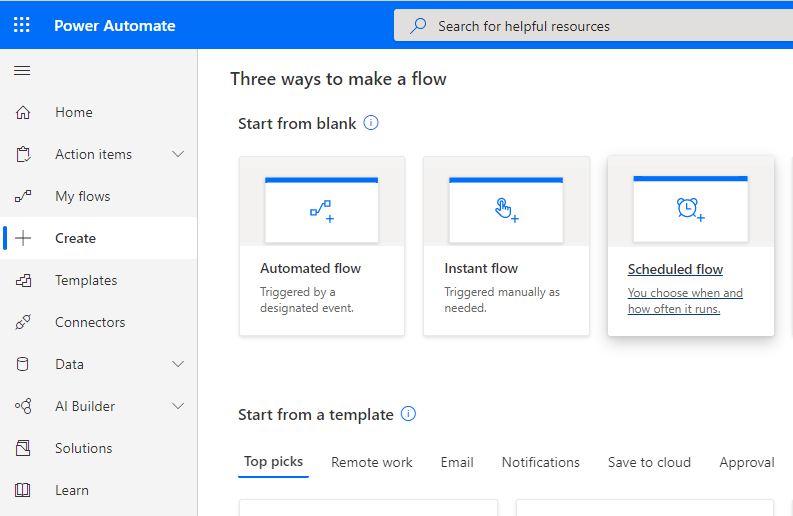
To begin, Lidia logs into Microsoft Flow and creates a new scheduled flow:
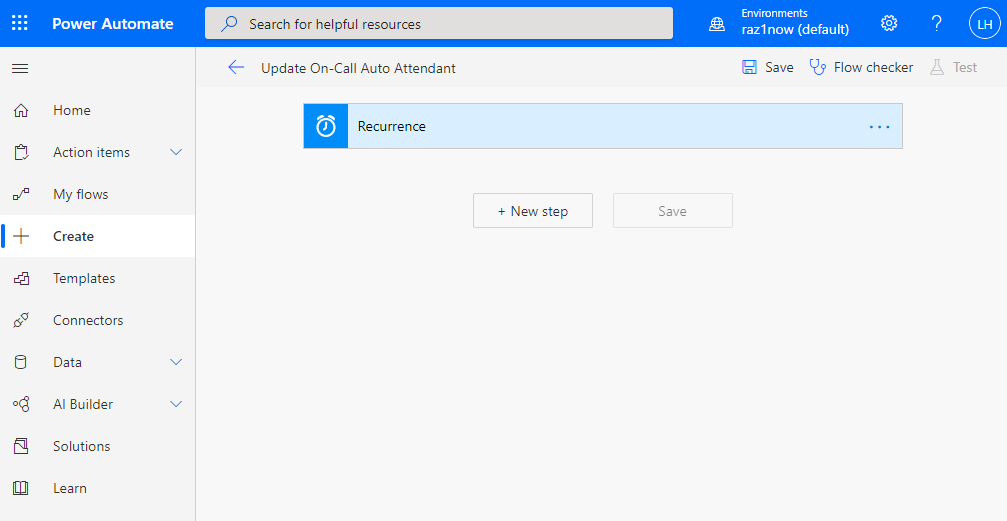
With the flow name, Update On-Call Auto Attendant, Starting time and
recurrence – 2:00 pm every day. The start time is dependent on the shift’s start time.
The idea is to run the flow a bit earlier in the day (before the shift starts), so in
case of the flow failure, there’s time to troubleshoot the cause of the failure without
any rush. Also, the Auto Attendant is configured in such a way, that during business
hours, the menu options do not lead to an operator. After the business hours, there’s an
option in the auto attendant to transfer the call to the operator – our on-call person.
In other words, the start of the shift coincides with the start of the “after hours”
of the Auto Attendant.

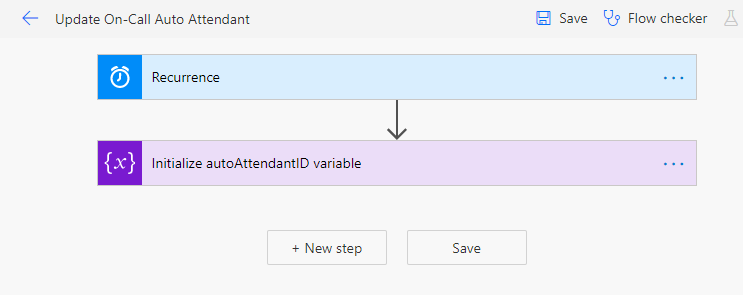
Once we click the Create button, we get to the start of our flow and ready to add all the steps comprising the flow
Main Flow Steps
Trigger: Recurrence
The very first step is our trigger and in our case, it controls when and how often to run the flow. The flow could be edited at any time and the trigger adjusted accordingly. We’re assuming there’s only one “on-call” shift that starts each day, and therefore we’ll trigger the flow run every day, starting at the same time, before the actual shift start time.
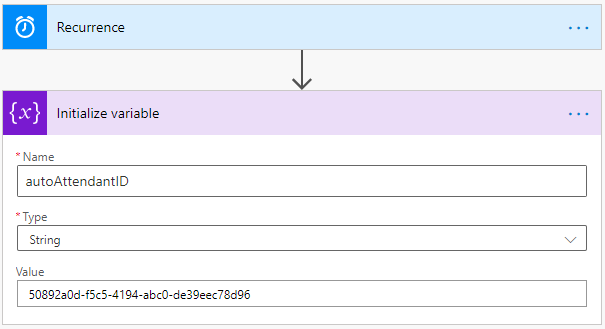
Step: Initialize autoAttendantId variable
In this step, we set a variable named autoAttendantID which contains
the GUID of our on-call auto attendant. You may remember we used
one
in the part 1
when testing the runbook, so for now let’s use the same
50892a0d-f5c5-4194-abc0-de39eec78d96 GUID. And if you later
decide to share the flow with any other team, then the only thing they
would need to change in the flow is to update the autoAttendantID
variable to match the ID of their Auto Attendant (and a few other things, like
shift’s schedule and team’s channels)
| Step Name | Initialize autoAttendantId variable |
| Action Category | Built-in / Variable |
| Action |  |
| Variable Name | autoAttendantId |
| Type | string |
| Value | 50892a0d-f5c5-4194-abc0-de39eec78d96 |
And you should end with something like
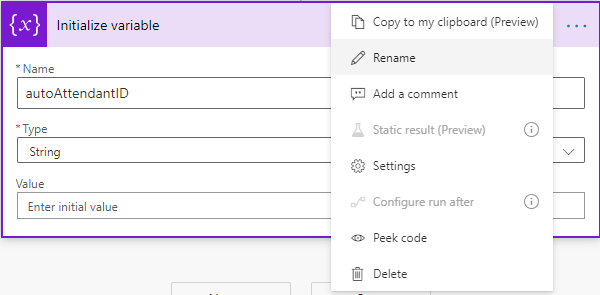
When working with the flows, it is always a good idea to give each step a descriptive name, so when you get back to that flow in a month, you would know why each step is there and what it does. So let’s rename our step to Initialize autoAttendantID variable, and we’ll keep naming each step, to keep everything neat. You even can take it one step further and put a comment for each step.

And now we have both: the trigger and the next step configured
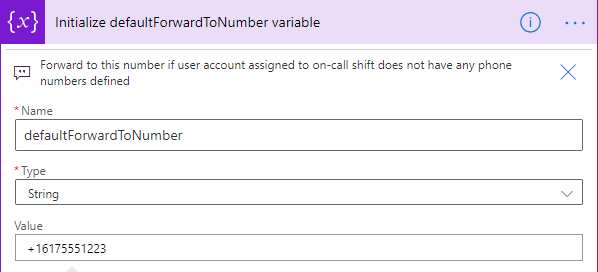
Step: Initialize defaultForwardToNumber variable
In this step, we initialize a defaultForwardToNumber variable. This is a failsafe in case a user assigned to the On-Call shift does not have any phone number assigned on his account.
| Step Name | Initialize defaultForwardToNumber variable |
| Action Category | Built-in / Variable |
| Action | |
| Variable Name | defaultForwardToNumber |
| Type | string |
| Value | +16175551223 |
Alternatively, you could just fail the Flow run, in case the user assigned to the “OnCall Rotation” shift does not have any phone number assigned.
Step: Initialize forwardTo variable
In this step, we create a placeholder for the variable named forwardTo and later in the flow, we would set this variable’s value to a phone number from User’s phones.
| Step Name | Initialize forwardTo variable |
| Action Category | Built-in / Variable |
| Action | |
| Variable Name | forwardToNumber |
| Type | string |
| Value | Leave empty |
Step: Shifts for the next two days
In this step, we connect to our Shifts schedule and list all the shifts starting from the beginning of the day:
| Step Name | Shift for the next two days |
| Action Category | Shifts |
| Action | 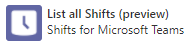 |
| Team | Awesome Support |
| Advanced Options | |
| From Start Time | Dynamic expression: startOfDay(utcNow()) |
| To End Time | Dynamic expression: addDays(startOfDay(utcNow()), 2, 'yyyy-MM-ddT23:59:59Z') |
| Page Size | Leave empty |
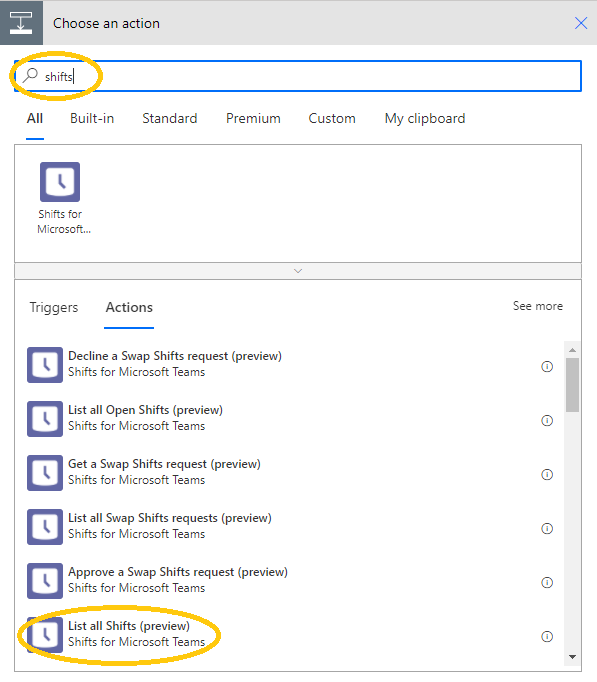
Hint: Use searching to find the correct action. Just type in “shifts” into the search box and you’ll get the right component and list of available actions associated with that particular component.
We are only interested in the shifts starting today, and not all the shifts from the beginning of the time. To achieve that, we use Dynamic Content and Expressions.
For example for From Start Time
- Click on Add dynamic content
- Select Expression tab
- Type in our expression, in this particular case:
startOfDay(utcNow()) - And click the OK button
And should end up with something which looks like

For the To end Time field we use the addDays(startOfDay(utcNow()), 2, 'yyyy-MM-ddT23:59:59Z')
dynamic expression, which just adds two extra days from today. In other
words, we’re listing all the shifts for the next two days from today (in UTC)

Step: Filter OnCall shifts only
The list of shifts from the previous step will include all the shifts defined in the schedule. If you have assigned any other than “OnCall Rotation” shifts, those will be present in the list. But we are only interested in the “OnCall Rotation” shifts, and we’ll use a filter to get on-call shifts only.
| Step Name | Filter OnCall shifts only |
| Action Category | Built-in / Data Operation |
| Action | 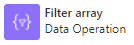 |
| From | Dynamic Content: Shifts List from the Shifts for the next two days |
| Left-hand Value | Shifts display name |
| Operation | is equal to |
| Right-hand Value | OnCall Rotation |
In the “Advanced editing mode”, it should look something like
And if you click the Ellipsis and then Peek Code you would get a JSON representation of this step, looking like
{
 "inputs": {
   "from": "@outputs('Shifts_for_the_next_two_days')?['body/value']",
   "where": "@equals(item()?['sharedShift/displayName'], 'OnCall Rotation')"
 }
}
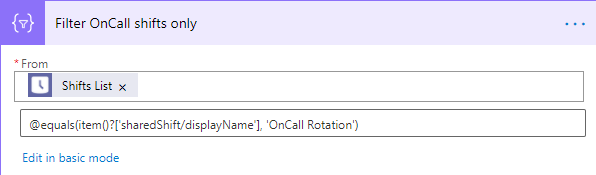
Step: Filter Shifts starting today
In the Shifts for the next two days step, the time range was set for two days, because if the shifts end after our To End Time field, then the shift would be omitted from the result. In this step, we filter only the shifts that start today.
| Step Name | Filter Shifts starting today |
| Action Category | Built-in / Data Operation |
| Action | |
| From | Dynamic Content: Body from the Filter OnCal shifts only |
| Left hand Value | Dynamic Expression: startOfDay(item()?\[\'sharedShift/startDateTime\'\]) |
| Operation | is equal to |
| Right hand Value | Dynamic Expression: startOfDay(utcNow()) |
In the advanced editing mode, the expression should be
@equls(startOfDay(item()?['sharedShift/startDateTime'), startOfDay(utcNow())) and peeking at the code should give us:
{
  "inputs": {
    "from": "@body('Filter_OnCall_shifts_only')",
    "where": "@equals(startOfDay(item()?['sharedShift/startDateTime']), startOfDay(utcNow()))"
  }
}
Peeking at the step’s code is a great way to see how thin work under the hood:
Step: Check for empty result
In this step, we are checking if the previous step did not find any OnCall shifts, like situations when the manager forgot (but can this really happen? rhetorical question) to publish the Shifts schedule or assign any OnCall shifts
| Step Name | Check for empty result |
| Action Category | Built-in / Control |
| Action |  |
| Left hand Value | Dynamic Expression: empty(body('Filter_Shifts_starting_today)) |
| Operation | is equal to |
| Right-hand Value | Dynamic Expression: true |
This is going to branch our flow into two different branches:
- “If yes” branch – the branch that gets executed if there were no OnCall Rotations shifts found for today. This branch should raise an alarm and fail the flow execution. But it is really up to you, maybe not having on-call shifts is a normal situation and it is fine to terminate the flow gracefully
- “If no” branch – the “nominal” state branch, this is the branch we’re executing when everything so far looks normal and we found an *OnCall Rotation *shift for today
If yes branch steps
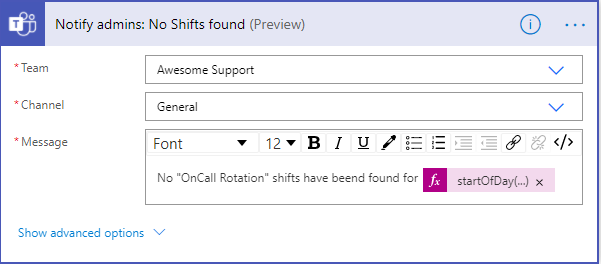
Step: Notify admins: No Shifts found
In this step, we post a message in a channel notifying the manager or an admin that no Shifts have been found and the situation may require manual intervention. Alternatively, you could kick off a flow, creating a support ticket, but for our purposes, just a notification in the channel would suffice.
| Step Name | Notify admins: No Shifts found |
| Action Category | Microsoft Teams |
| Action |  |
| Team | Awesome Support |
| Channel | General |
| Message | No "OnCall Rotation" shifts have been found for |
| Message continuation | Dynamic Expression: startOfDay(utcNow(), 'yyyy-MM-dd') |
In the Message field we add some static content – our message, and we also, add dynamic content, so we know for what day we did not find any on-call shifts.
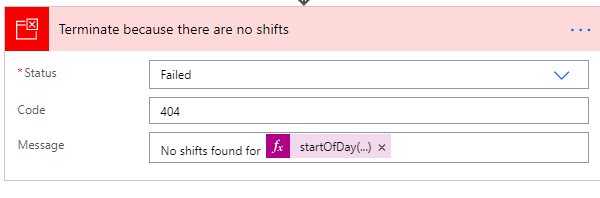
Step: Terminate because there are no shifts
In this step we terminate the flow with a failure code, to raise an alarm.
| Step Name | Terminate because there are no shifts |
| Action Category | Built-in / Control |
| Action |  |
| Status | Failed |
| Code | 404 |
| Message | No shifts found for |
| Message Dynamic Content | Dynamic Expression: startOfDay(utcNow(), \'yyyy-MM-dd\') |
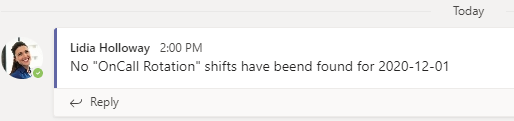
And this should complete our “If yes” branch. If this branch is executed, then users would get this message posted to the team’s channel:
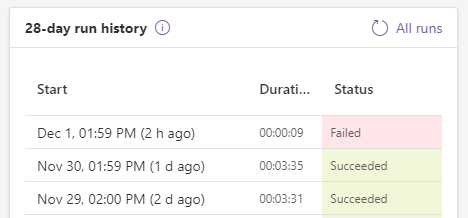
And the 28-day run history would log a failure:
If no branch steps
In this branch, we continue a normal flow operation, and from a high-level overview, we do the following:
- for the user associated with the “OnCall Rotation” shift we look up the phone numbers, “display name”
- pick a phone number to be set up as the operator
- start our run book to update the Auto Attendant
- notify the Users or admins about job status: success or failure
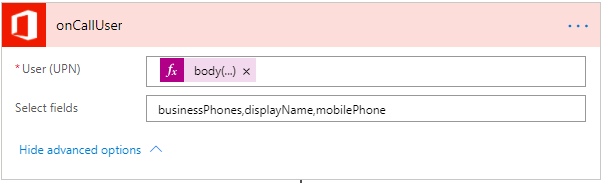
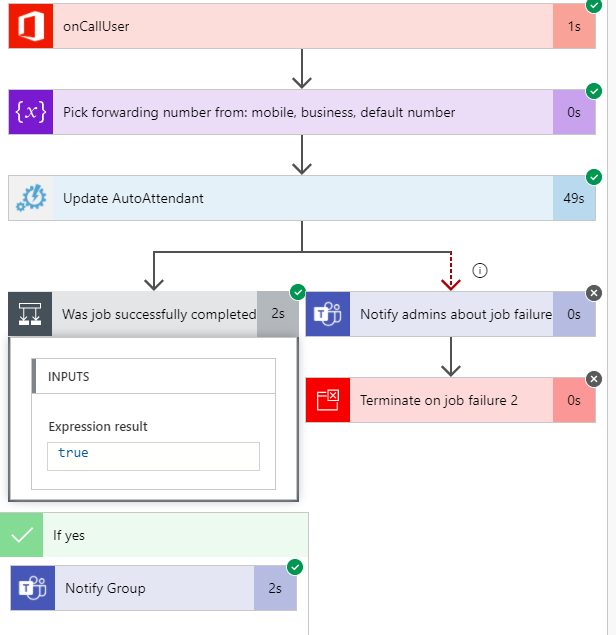
Step: onCallUser
In this step, we look up the phone numbers and displayName of the user assigned to the “OnCall Rotation” Shift
| Step Name | onCallUser |
| Action Category | Office 365 Users |
| Action |  |
| User (UPN) | Dynamic expression: body('Shifts_starting_today')?[0]['userId'] |
| Select fields | businessPhones,displayName,mobilePhone |
For search criteria (user UPN) we use the output of the Filter Shifts Starting Today step and that output is a list of shifts. We always select the 1st element of the list, in other words, in case there are multiple “OnCall Rotations” shifts for the same day, we’ll only pick the 1st one.
Code peek:
{
  "inputs": {
    "host": {
      "connectionName": "shared_office365users",
      "operationId": "UserProfile_V2",
      "apiId": "/providers/Microsoft.PowerApps/apis/shared_office365users"
     },
    "parameters": {
      "id": "@body('Shifts_starting_today')?[0]['userId']",
      "$select": "businessPhones,displayName,mobilePhone"
    },
    "authentication": "@parameters('$authentication')"
  }
}
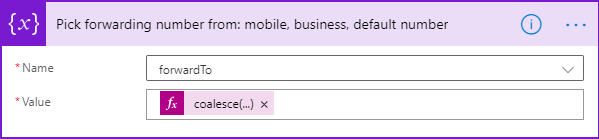
Step: Pick forwarding number from: mobile, business, default number
In this step, we pick a phone number from the following options in the decreasing order of preference:
- Mobile phone number
- Business (work) phone number
- Default defaultForwardToNumber number
And set the forwardTo variable we’ve initialized earlier
| Step Name | Pick forwarding number from: mobile, business, default number |
| Action Category | Built-in / Variable |
| Action |  |
| Name | forwardTo |
| Value | Dynamic expression: coalesce(body('onCallUser')?\['mobilePhone'],body('onCallUser')?\['businessPhones']?[0],variables('defaultForwardToNumber')) |
Code peek:
{
  "inputs": {
    "name": "forwardTo",
    "value": "@{coalesce(body('onCallUser')?['mobilePhone'],body('onCallUser')?['businessPhones']?[0],variables('defaultForwardToNumber'))}"
  }
}
Step: Update AutoAttendant
In this step we make an Azure Automation Create Job step to run the run book and update our Auto Attendant with the new Operator Phone number. But before Lidia can Create Job and run the runbook, she needs to be granted permission for Azure Resource Group and Automation Account:
Granting Azure Permission
Note: The following operations require Admin access to Azure.
- Login into Azure Portal as an administrator
- In Azure Portal navigate to All Resources and pick the O365Automate automation account
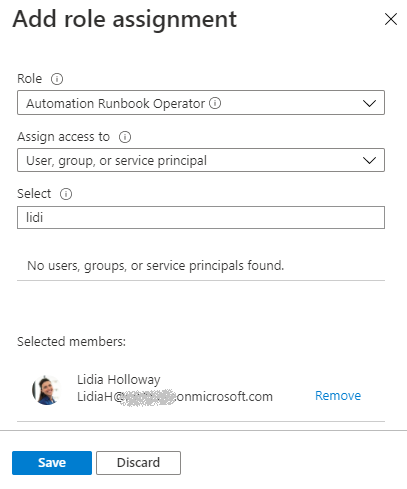
- Click on Access Control (IAM) and then Add role assignments
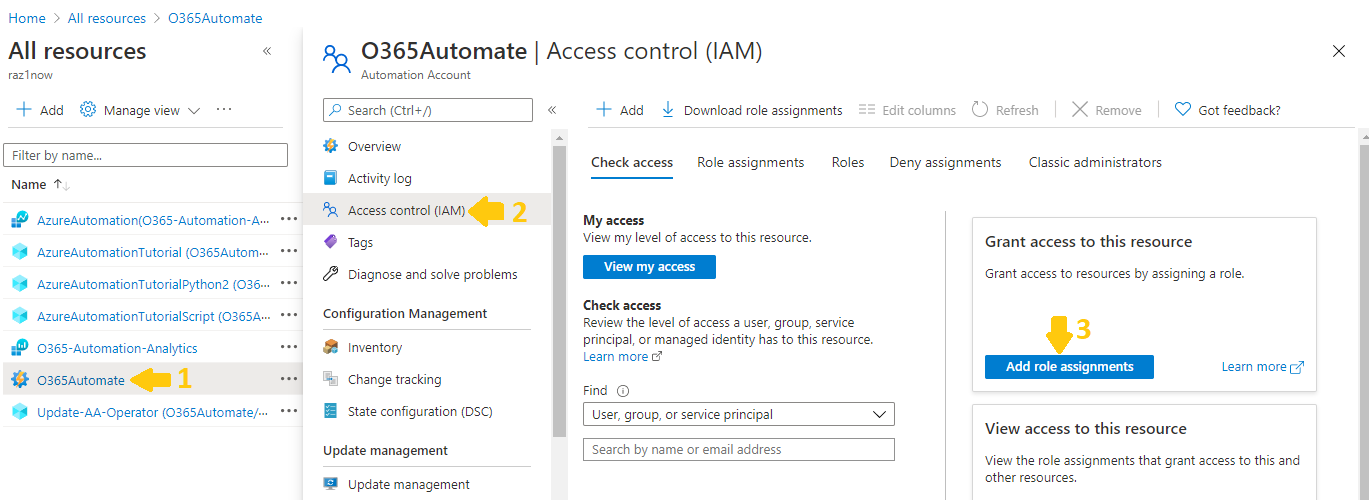
- Grant Automation Job Operator role to LidiaH
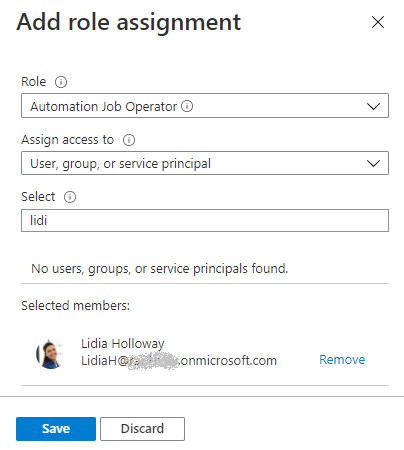
- Click Save
- Repeat steps #4 and #5 to grant Automation Runbook Operator role
to LidiaH
Visit Automation Job Operator to find more about permissions granted for this role
Confirm Resource Group and Automation Account names
While still logged in as an Azure administrator, navigate to Automation account’s Overview tab
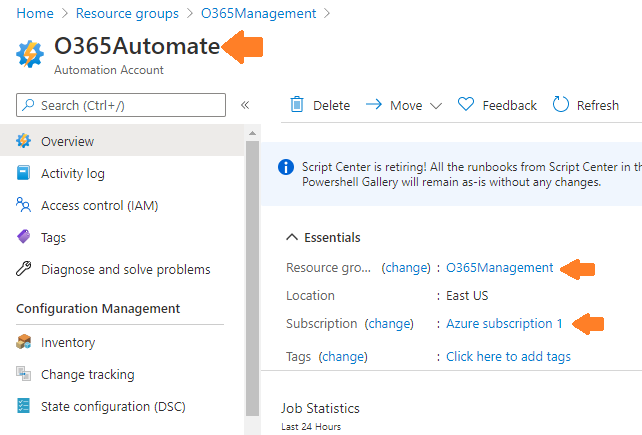
and confirm
- Automation Account group name – O365Automate
- Resource Group Name – O365Management
- Subscription – Azure subscription 1
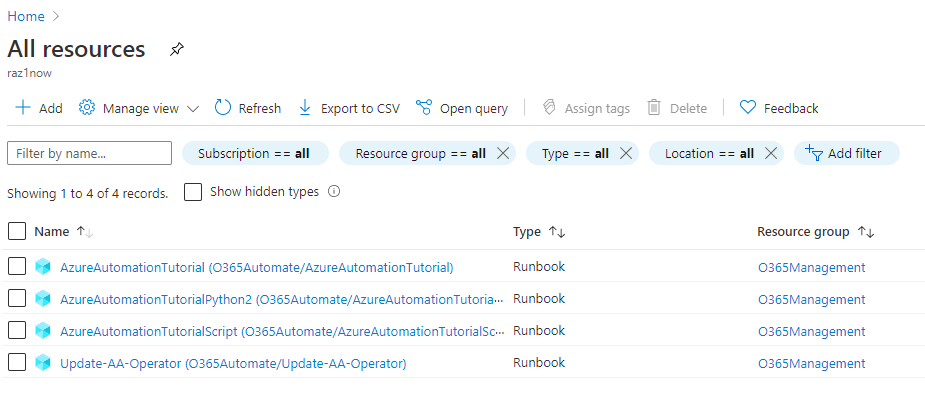
If everything was configured correctly, LidiaH should be able to login into Azure Portal, and see all the runbooks in Home -> All Resources
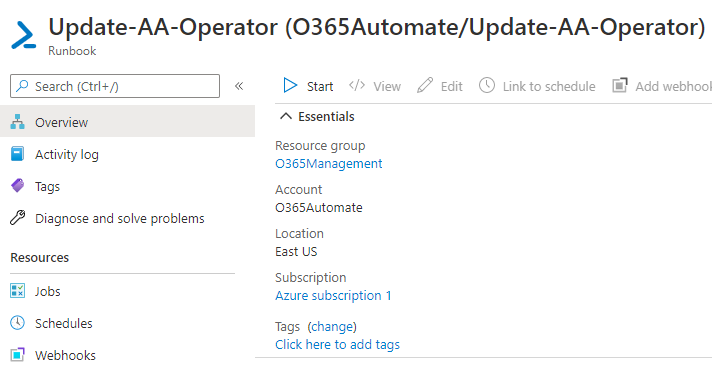
And, if you open the Update-AA-Operator runbook, the Start button should not be greyed out
Configuring the step
Now we are ready to add the Azure Automation Create Job action. Be advised, that unless you are the Azure Admin (and in this exercise LidiaH is just a simple user), the drop down boxes for the Job fields (like Resource Group name and Automation Account) won’t work and you do have to type in those manually
| Step Name | Update AutoAttendant |
| Action Category | Azure Automation |
| Action |  |
| Subscription | Azure subscription 1 |
| Resource Group | Enter Custom value: O365Management |
| Automation Account | Enter Custom value: O365Automate |
| Runbook Name | Update-AA-Operator |
| Wait for Job | Yes |
| Runbook Parameter phone | Dynamic Content Variable: forwardTo |
| Runbook Parameter AAId | Dynamic Content Variable: autoAttendantID |
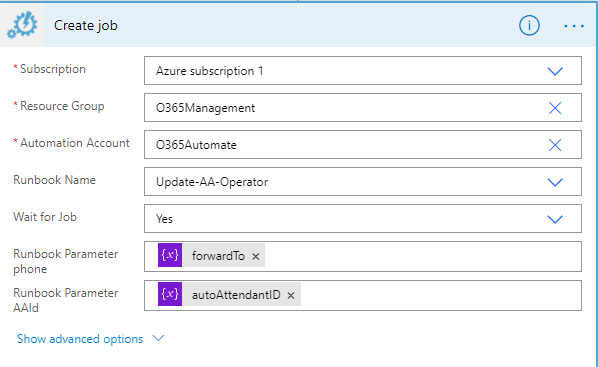
We wait for the job completion, so on the success, we can notify the user about job success, or notify the admins in case of a job failure
Step: Was job successfully completed
In this step, we are checking if the job scheduled in the previous step Completed successfully
| Step Name | Was job successfully completed |
| Action Category | Built-in / Control |
| Action | |
| Left hand Value | Dynamic Content: Status of Update AutoAttendant |
| Operation | is equal to |
| Right-hand Value | Completed |
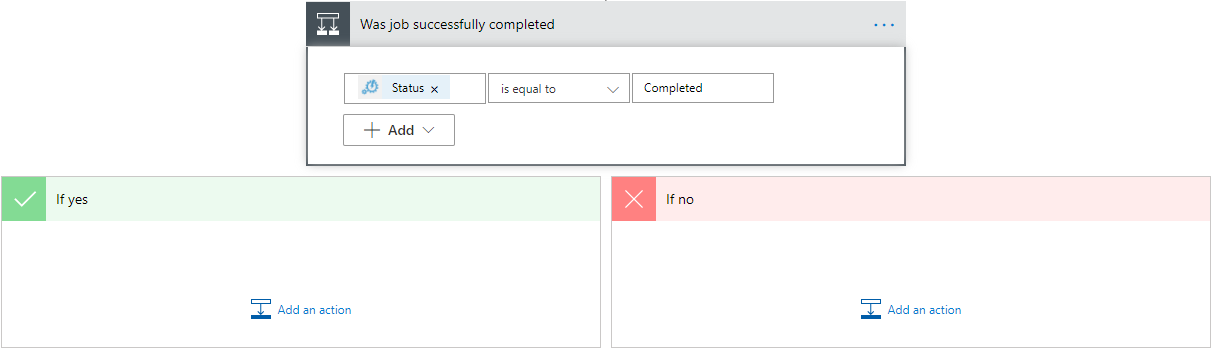
This is going to branch the flow run into one of the two branches:
- “If yes” branch – the branch that gets executed on successful job completion and we notify the group by posting a message in the Teams Channel
- “If no” branch – the job did not complete, and in this case, we notify the admins and terminate the run with a failure code
Was job successfully completed: “If yes” branch steps
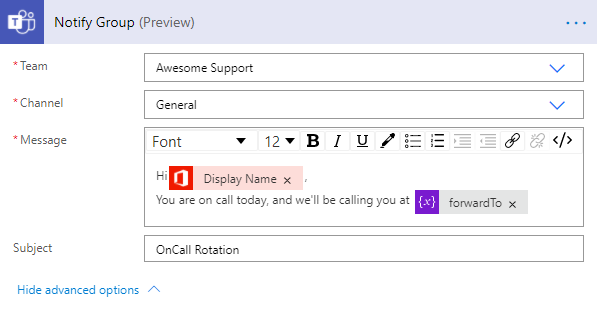
Step: Notify Group
In this step, we post a message in the channel notifying the users about who is OnCall rotation today
| Step Name | Notify Group |
| Action Category | Microsoft Teams |
| Action | |
| Team | Awesome Support |
| Channel | General |
| Message | Hi |
| Message Dynamic Content | Dynamic Content: Display Name of onCallUser |
| Message (continued) | You are on call today, and we’ll be calling you at |
| Message Dynamic Content | Dynamic Content Variables: forwardTo |
| Advanced | |
| Subject | OnCall Rotation |
In the Message field we add some static content and some dynamic content, like *Display Name *and phone number we are forwarding calls to.
Code peek:
{
  "inputs": {
    "host": {
      "connectionName": "shared_teams",
      "operationId": "PostMessageToChannelV3",
      "apiId": "/providers/Microsoft.PowerApps/apis/shared_teams"
    },
    "parameters": {
      "groupId": "group_id_is_hidden_here",
      "channelId": "channel_id_is_hidden_here",
      "body/body/content": "<p>Hi @{outputs('onCallUser')?['body/displayName']},<br>\nYou are on call today, and we'll be calling you at @{variables('forwardTo')}\</p>",
      "body/subject": "OnCall Rotation"
    },
    "authentication": "@parameters('$authentication')"
 }
}
Was job successfully completed: “If no” branch steps
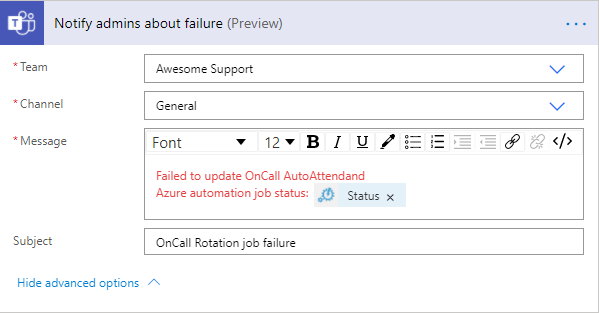
Step: Notify admins about failure
In this step, we post a message in a channel notifying the manager or admin about the job failure. Alternatively you could kick off a process of creating a support ticket, but for our purposes, just a channel notification would suffice.
| Step Name | Notify admins about failure |
| Action Category | Microsoft Teams |
| Action | |
| Team | Awesome Support |
| Channel | General |
| Message | Failed to update OnCall AutoAttendant, Azure automation job status: |
| Message Dynamic Content | Dynamic Content: Status of Update AutoAttendant |
| Advanced | |
| Subject | OnCall Rotation job failure |
Code peek:
{
 "inputs": {
   "host": {
     "connectionName": "shared_teams",
     "operationId": "PostMessageToChannelV3",
     "apiId": "/providers/Microsoft.PowerApps/apis/shared_teams"
    },
   "parameters": {
     "groupId": "group_id_is_hidden_here",
     "channelId": "channel_id_is_hidden_here",
     "body/body/content": "<p><span style=\"color: rgb(226,80,65)\">Failed to update OnCall AutoAttendand<br>\nAzure automation job status: </span><span style=\"color: rgb(226,80,65)\">@{outputs('Update_AutoAttendant')?['body/properties/status']}</span><span style=\"color: rgb(226,80,65)\"></span></p>",
     "body/subject": "OnCall Rotation job failure"
   },
   "authentication": "@parameters('$authentication')"
 }
}
Step: Terminate on job failure
In this step we terminate the flow with a failure code, to raise an alarm.
| Step Name | Terminate on job failure |
| Action Category | Built-in / Control |
| Action | |
| Status | Failed |
| Code | Dynamic content: Status of Update AutoAttendant |
| Message | Failed to update OnCall Auto Attendant |
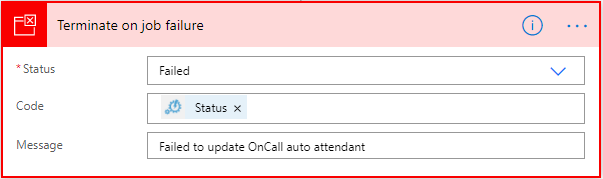
Code peek:
{
  "inputs": {
    "runStatus": "Failed",
    "runError": {
      "code": "@outputs('Update_AutoAttendant')?['body/properties/status']",
      "message": "Failed to update OnCall auto attendant"
    }
  }
}
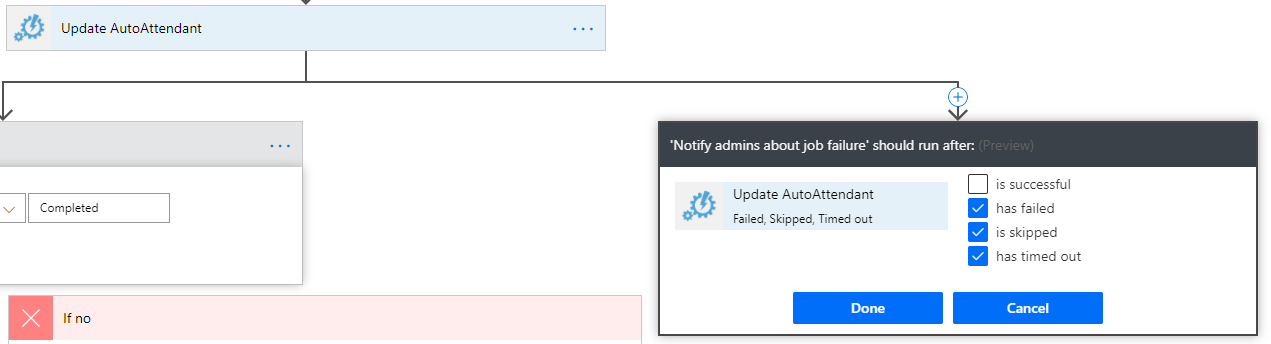
Parallel, run after branch
After the Update AutoAttendant step, we are going to add a parallel branch and set the steps to run only if the job step failed. This is to catch conditions when a job fails without creating a status, e.g. a failed job submission
Click on the link between Update AutoAttendant step and Was job successfully completed step, and add a parallel branch*
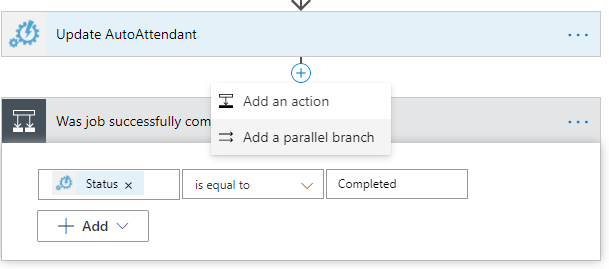
In this parallel branch, we notify admins about job failure, and we configure this branch to run only if the Update AutoAttendant step failed
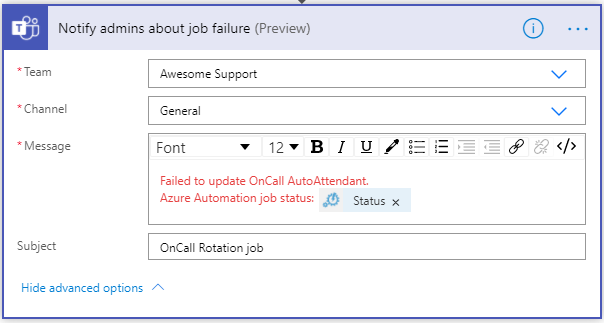
Step: Notify admins about job failure
In this step, we post a message in a channel notifying the manager or admin about the job failure.
| Step Name | Notify admins about job failure |
| Action Category | Microsoft Teams |
| Action | |
| Team | Awesome Support |
| Channel | General |
| Message | Failed to update OnCall AutoAttendant, Azure automation job status: |
| Message Dynamic Content | Dynamic Content: Status of Update AutoAttendant |
| Advanced | |
| Subject | OnCall Rotation job failure |
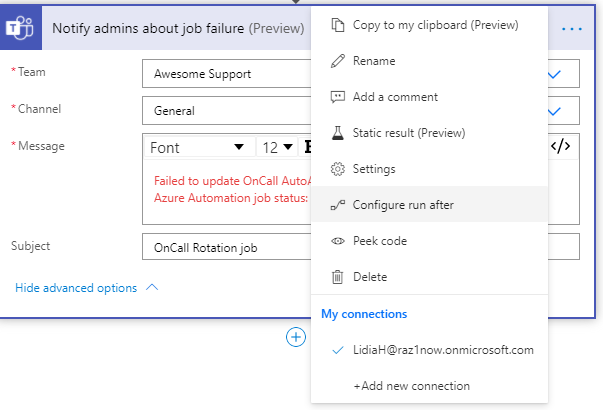
Once this step is configured, click on ellipsis and then on configure run after
Uncheck is successful box and check:
- Has failed
- Is skipped
- Has timed out
Step: Terminate on job failure 2
In this step we terminate the flow with a failure code, to raise an alarm.
| Step Name | Terminate on job failure 2 |
| Action Category | Built-in / Control |
| Action | |
| Status | Failed |
| Code | Dynamic content: Status of Update AutoAttendant |
| Message | Failed to update OnCall Auto Attendant |
At this point the flow configuration is done, click the Save button to save the flow and it is the time to test the flow.
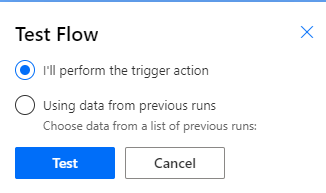
Testing the flow
Once the flow is saved, you can do a test run of the flow

Click on the Test link (top right corner), check the I’ll perform the trigger action checkboxes and then click the Test button
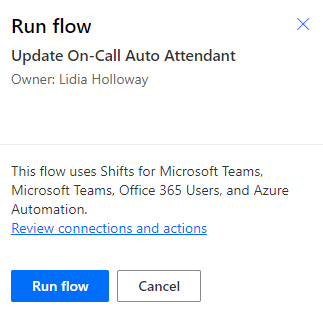
Click the Run flow button
And you should get a notification about the flow being successfully started
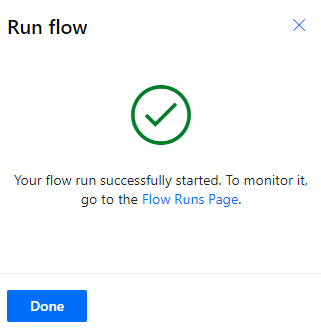
Click on the Done button and it should get you to the run result page. If the run was successful, then you should get all the steps this specific flow run took. For a successful flow run, the last steps should look like
And in the “*Awesome Support” *Team General channel we should get a message e.g.

And if Lidia opens the Flow app in Teams Client, then she would have access to all recent flow runs and status of each run.

And if anything goes wrong, Lidia could do some troubleshooting. For example, we notice a flow run failure:
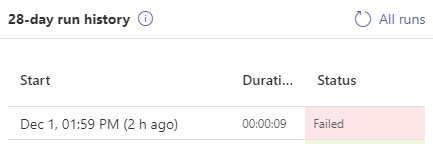
Opening this run results, Lidia can see that the “If yes: branch” got executed, signifying that there were no OnCall Rotation Shift(s) assigned to anyone today and we decided that no shifts should raise an alarm as in our case we always supposed to have someone on-call.

And this could serve us as another indication, why it is better to properly name each step, because just by looking at Terminate because there are no shifts we already have a big hint why the run has failed. Consider if the last step had just the default Terminate name? Then you still would analyze the flow to check why really it was terminated.